 |
Tri-R Technologies TR-4
BUILDER'S MANUAL
This Builder's Manual is NOT the official manual as published by TRI-R Technologies.
Introduction 3
Quick Links to Introduction Sub-Sections:
HEALTH
AND SAFETY IN HANDLING COMPOSITE MATERIALS
COMPOSITE
TERMS AND PROCEDURES
REMOVING
PEEL PLY
BID
PREPARATION
FOR BONDING
MOLDED
SURFACES
PEEL
PLY SURFACES
MICRO and
FLOX
BONDING
AND LAMINATING TO FOAM
GREEN
TRIMMING
CAUTIONS
DIMENSIONS
AND STATIONS SYSTEM
STATIONS
BUTT
LINE
WATERLINE
SHOP
& TOOLS
TOOLS
& EQUIPMENT
TYPICAL
HAND
TOOLS
TYPICAL POWER TOOLS
SUGGESTIONS
EPOXY
SCALES
SCALES
DIRECTIONS FOR USE
SHOP & TOOLS
The area where you will be working on these kit components should be properly illuminated, and relatively clean and uncluttered. Sufficient room must be provided to properly work around the larger components, at least one large flat table area should be provided for, for cutting and working with the fiberglass materials. Areas where parts are to be temporarily stored or placed must be free of dirt, grease, waxes or any other contaminate that may penetrate the surface of the parts and prevent proper adhesion. Some form of protection, such as brown wrapping paper should be used to keep the surfaces and equipment from resin or adhesive spills.
The temperature of the workplace is important for other factors than just personal comfort. Temperatures much below 70 degrees F. will make the viscosity of many of the liquid materials difficult to work with, and too cold conditions will hamper the proper cure of the resins and adhesives. Some sort of heat source is suggested if you plan on working in cold weather, and materials should be allowed to warm up before using them. In areas of high temperatures, the working times of mixed resins and adhesives will be shortened. Short working times may present problems in properly positioning components to be joined, and one must not attempt to work with materials once the curing process has started. Moving or other rework during the initial setting process will lead to dangerous weakening of the structural attachments. Use "dry assembly" to verify positioning and clamping provisions before the resin or adhesive is mixed ( especially during hot weather ).
Although most of the joining materials used with this kit have very little vapors or fumes, it is still good practice to provide adequate ventilation of the work area. This is particularly true if finishing or painting operations are planned for this same area.
Working with pre molded composite panels minimizes the amount of special equipment or tools required, as compared to most other types of aircraft construction. A fairly modest assemblage of hand and power tools will accomplish the tasks quite adequately.
(asterisk means very useful but not a necessity)
| screwdrivers | hammer |
| hacksaw | hacksaw blade holder |
| pliers | *cleco pliers |
| tin snips | *clecos |
| scissors (heavy duty to cut glass) | utility knife |
| 100 degree countersink | razor blades |
| non porous gloves | sand paper |
| files | measuring tape and rulers |
| straight edge (long metal) | level |
| plumb bob | square |
| pencils | brushes |
| mixing containers (several sizes) | wall thermometer |
| clamps (numerous) | wire cutters |
| masking tape | *circular cutter (pizza cutter) |
| artists spatula | rubber maid round food containers |
| *three beam scale | digital scale (Accurate Zero Reset) |
| plastic sheeting | *velum in roll form (a clear plastic film) |
| squeegees (several different sizes) | *rivet gun or rivet squeezers |
| thin blade modeling saw | "T" sander |
| drill motor and bits | saber saw |
| grinding disks | heat gun |
| soldering iron | dremel type grinder |
| *drill press | *combo circular/belt sander |
Builders Note: The Dremel Grinder
has proved to be the most useful tool that I have. The first few times
of use I seemed to have trouble controlling the unit and speed. After
some use I have now become very comfortable with it's use and can remove
a major buildup of epoxy and glass or a layer of paint with equal ease. I
can't think of trying to build a composite aircraft without one. I
highly recommend the flexible shaft extension as well. (Bob
Reed)
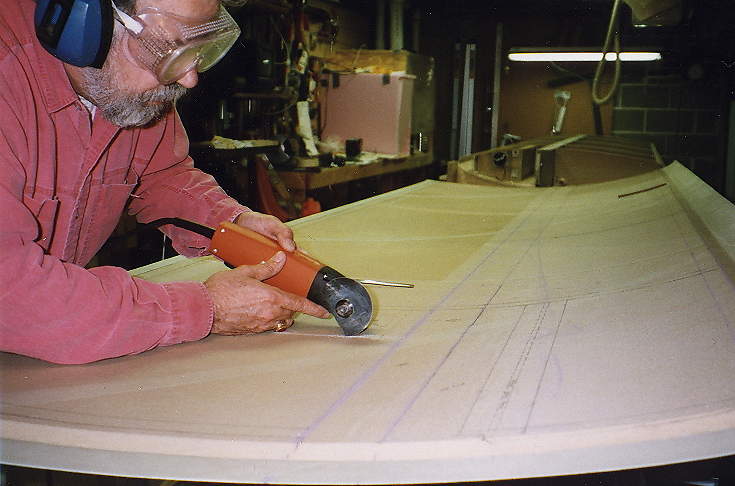
Builders Note: Here I am cutting out an
access panel for the spar attach bolt. The tool I am using is a FEIN detail
sander, outfitted with the optional saw blade. I cannot recommend this tool
too strongly for working on fiberglass airplanes. The saw blade does not
spin, it rotates back and forth through a 2-degree arc, cuts a very fine
kerf, and does not make a cloud of dust/smoke like a Dremel grinder does.
(Bill Schertz)
|
A coffee can or similar containers (glass jars are handy, with lids), for using to clean your tools and brushes with acetone or MEK during operations and after. NO SMOKING, FLAMES OR HEATERS NEAR BY. Experienced workers have strongly suggested that at least two sets of scissors be used, and one of them be kept strictly for the dry, clean operations at the cutting table. Circular pizza type cloth cutters are the best for cutting glass cloth. These may be obtained from the local well stocked sewing supply store. The use of a backing material that will not dull the cutter blade is strongly recommended. These backing materials may also be purchased from the sewing stores. Olfa sells a full line of cutters and cutting boards. A hard smooth surface is best when working with glass cloth, such a masonite or hard plastic.
An easily fabricated epoxy balance scale will prove very useful for many of the assembly tasks in this kit. There are also epoxy measuring pumps on the market which will work even better, (and is highly suggested), by allowing less waste, and quicker measurements, the $150.00 or so cost can be justified in many cases. Contact Tri-R for pricing and availability. However, this balance system is easy to make, and will cost virtually nothing.
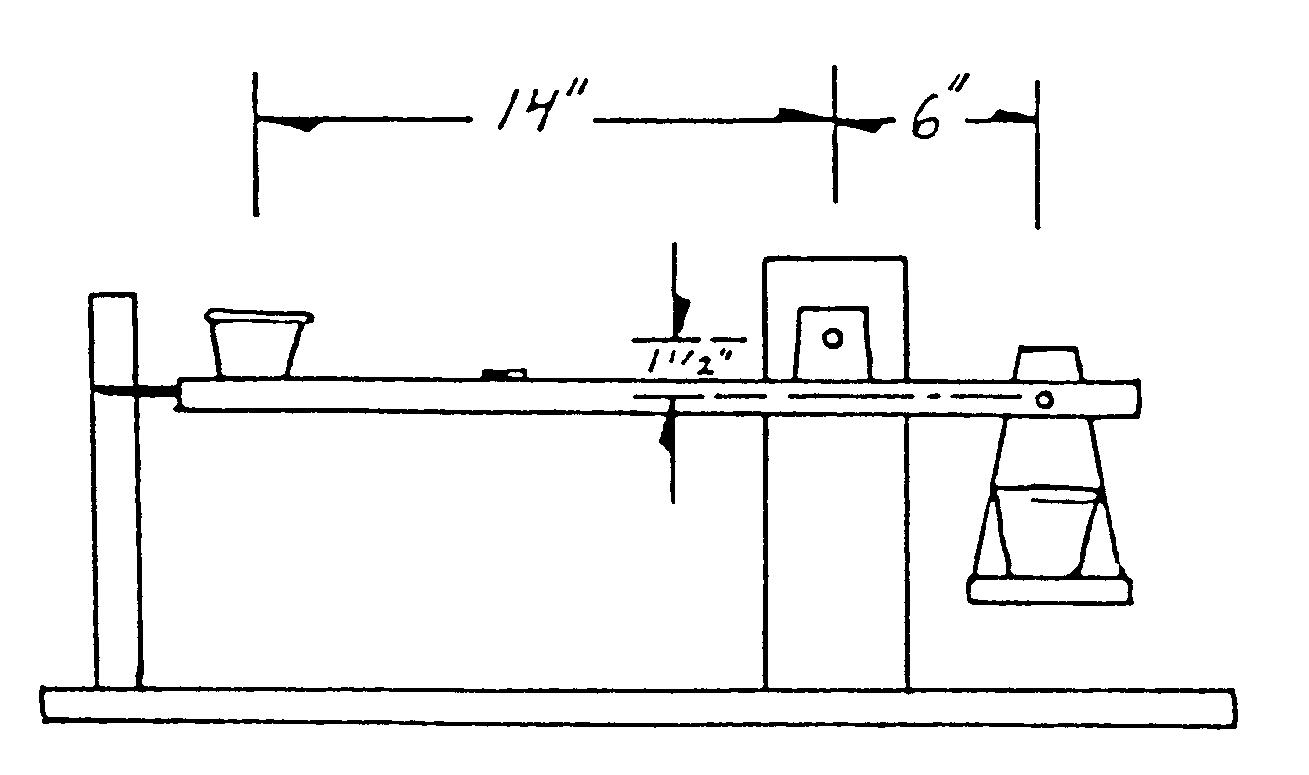
The epoxy in this kit is mixed at the proportion of 100 parts resin to 44
parts hardener (by weight). This proportion is controlled by the relative
length of the lever arms as shown in figure 1-5, and is common to many similar
epoxy systems. It is important that the pivot work at very low friction,
and the suggested method of construction is to "bush" the holes with a short
length of brass tubing (available in numerous sizes at you local hobby
store).
|
The perspective view in figure 1-6 shows how the balance is set up for use. The main ballast weight is to balance out the unequal arms of the lever, and if you use the same type of containers all the time it can be glued in place for convenience. Set up balancing for each use can then be accomplished by moving the smaller ballast weight. Verify the accuracy of you construction by using quantities of small uniform items such as nails, washer, pennies, etc. distributed in the 100/44 ratio in the appropriate cups. Change the marked location for the hardener cup to provide this calibration.
 |
Go To: INTRODUCTION